


- Recipe Index

- Desserts
- Cakes & Cupcakes
- Beaches, yoga, and cake pops
Beaches, yoga, and cake pops

This week we’re up at our family house in Nova Scotia, Canada. And we’re eating cake pops 🙂 Our house is situated on a northward-facing cove on Bell’s Island, one of the LaHave islands. It’s my favorite place ever. And so far the weather couldn’t be better, considering the islands have been getting a lot of bad weather prior to this week. We’ve been going to the beach every day, and the water is surprisingly warm for up here! The other day Rebe and I journeyed with our grandmother/Noni into town to do errands, and we stopped at a magical place called the Bulk Barn. It’s a store full of every single food item you can think of in these bulk containers, making it easy to buy as little or as much of something as you’d like. Down the first aisle I found chocolate of every which sort. The second aisle, piping supplies. The third, cake mix (by this point my head was full of ideas for what I could bake with all this stuff). The last aisle was full of sprinkles in different colors and sizes. I looked to Rebe and said, “Wait, but… I’m in love with bulk barn.”
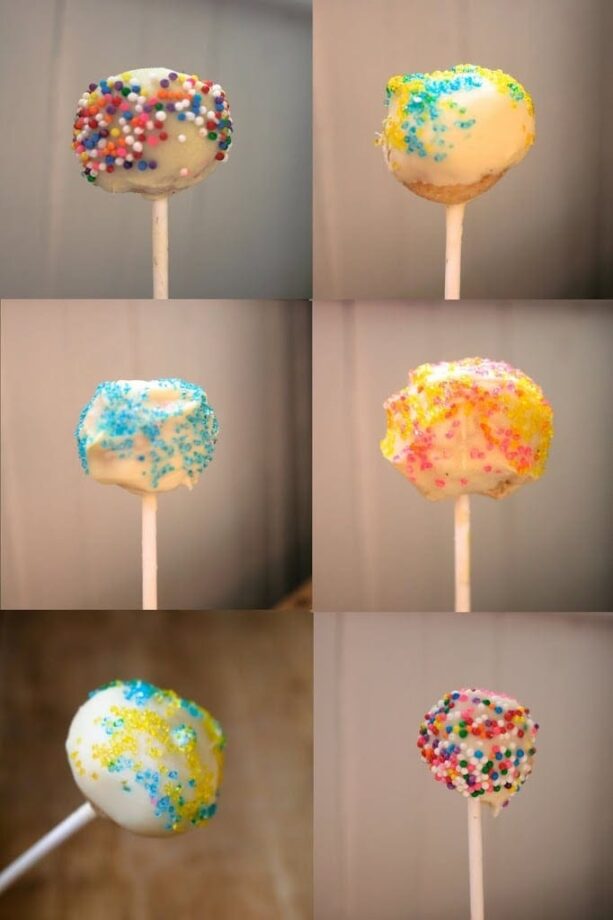
We finally decided on cake pops on account of their general awesomeness. Everyone loves cake (or at least those who matter…). And everyone loves finger-food. Then what better way to enjoy cake than in a bite-sized morsel with sprinkles on top? So we gathered our supplies (lollipop sticks, cake mix, white chocolate wafers, $0.06 worth of pink, blue, yellow, and rainbow sprinkles), and headed for the checkout.
Now back on the island with Friend Simone, swapping music and going out to the wharf to do some sunset yoga. And maybe another cake pop 🙂 Lovely, lovely day.
PrintBeaches, yoga, and cake pops
- Prep Time 30 minutes
- Cook Time 30 minutes
- Total Time 1hr
- Yield 50 cake pops
- Category dessert
- Method baked
- Cuisine american
Beaches, yoga, and cake pops
- Prep Time 30 minutes
- Cook Time 30 minutes
- Total Time 1hr
- Yield 50 cake pops
- Category dessert
- Method baked
- Cuisine american
Ingredients
- 1 box vanilla cake mix, prepared according to directions
- 16 ounce can of vanilla frosting
- 1 pound white chocolate wafers
Instructions
- After cake is cooked and cooled completely, crumble into large bowl.’
- Mix thoroughly with 1 can frosting. (I use the back of a large spoon, but it may be easier to use fingers to mix together. But, be warned, it will get messy. Also, you may not need the entire can of frosting, so start out by using almost the entire can and add more if you need to.)
- Roll mixture into quarter size balls and place on wax paper covered cookie sheet.
- Melt 90% of the chocolate in a double boiler on medium heat. Once melted, turn the heat down to low and add the other 10% of the chocolate. Using a whisk, stir until dissolved completely. Turn up the temperature to medium for about 2 minutes. The chocolate should now be tempered and ready to use! If it starts to harden, just turn on the heat for a minute until it re-melts.
- Dip the tip of your lollipop stick in a little of the melted chocolate and insert into the cake balls. (Insert a little less than halfway.)
- Place them in the freezer for no more than 10 minutes to firm up.
- Once firm, carefully insert the cake ball into the chocolate coating by holding the lollipop stick and rotating until covered. Once covered remove and softly tap and rotate until the excess chocolate falls off.
- Don’t tap too hard or the cake ball will fall off, too.
- Place in a styrofoam block to dry.
- Once chocolate is pretty much dry, decorate however you’d like with sprinkles!
- Prep Time 30 minutes
- Cook Time 30 minutes
- Total Time 1hr
- Yield 50 cake pops
- Category dessert
- Method baked
- Cuisine american
Leave a comment and rate this recipe!